Have you ever wondered how pro photographers have so much detail and low noise in their astrophotography images?
Astrophotography is challenging, and creating a single good image can take hours of preparation and sleep deprivation.
If you’re going to spend all that time on the perfect image, you have to do it right.
So how do you get more detailed astrophotography images without the noise?
Astrophotography noise can be reduced by a combination of stacking multiple images of the night sky and shooting the foreground during blue hour.
There’s actually a lot more to discuss about getting better details in your night sky’s. Let’s get started.
Why you should focus stack your astrophotography foregrounds
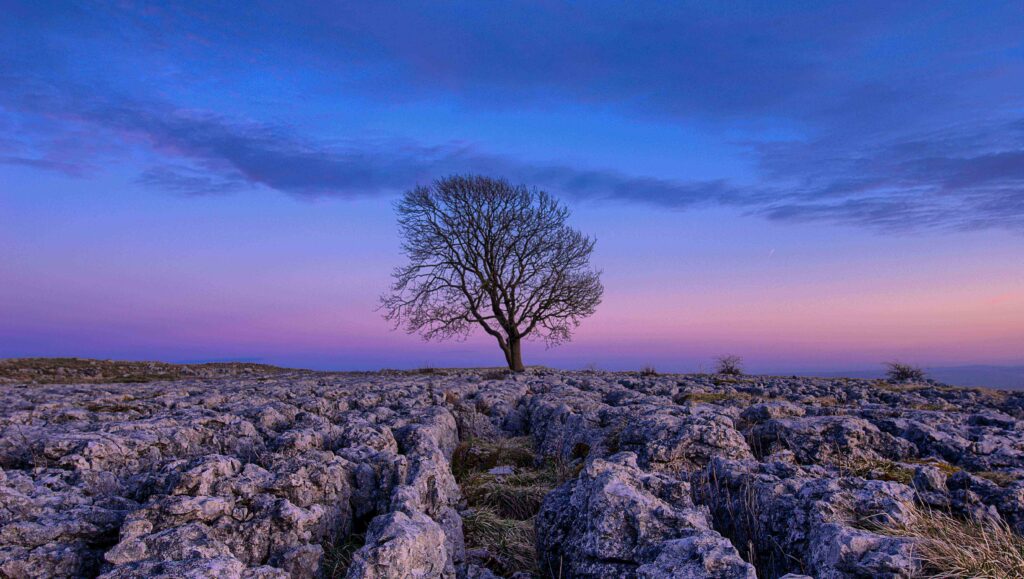
The goal of focus stacking in astrophotography is to make sure everything is in focus from the foreground to infinity. Most beginners doing astrophotography will only take one image of the night sky.
Capturing one image is easy and works great for foreground silhouettes, but usually these images have sharp stars and out focus foregrounds. That’s because astrophotography images are usually shot at f2.8 or wider.
To fix this, try focus stacking the foreground. Start at f8 or f11 and take about 7-8 photos from the most distant foreground to the most distant background.
It’s difficult to focus in the dark, bring a flashlight or headlamp to shine on the foreground. Next, snap a photo, and slightly change your focus and fire a photo a few millimeters at a time until you get to infinity.
Try not to use your finger on the shutter. Try using a remote or a 2 second timer.
To make this easier, try this during daylight hours, so you know if the focus needs to be turned clockwise or counterclockwise. This will also help you know how far you should turn the focus knob until you get to infinity.
How to do blue hour blends for astrophotography?
If you’ve ever wondered why your astrophotography images look so much worse than the pros, it probably has to do with a trick called blue hour blending.
Focus stacking is important to get the most detail out of your images, but if it’s dark out, you’ll get a cleaner image by doing a blue hour blend.
What is a blue hour blend?
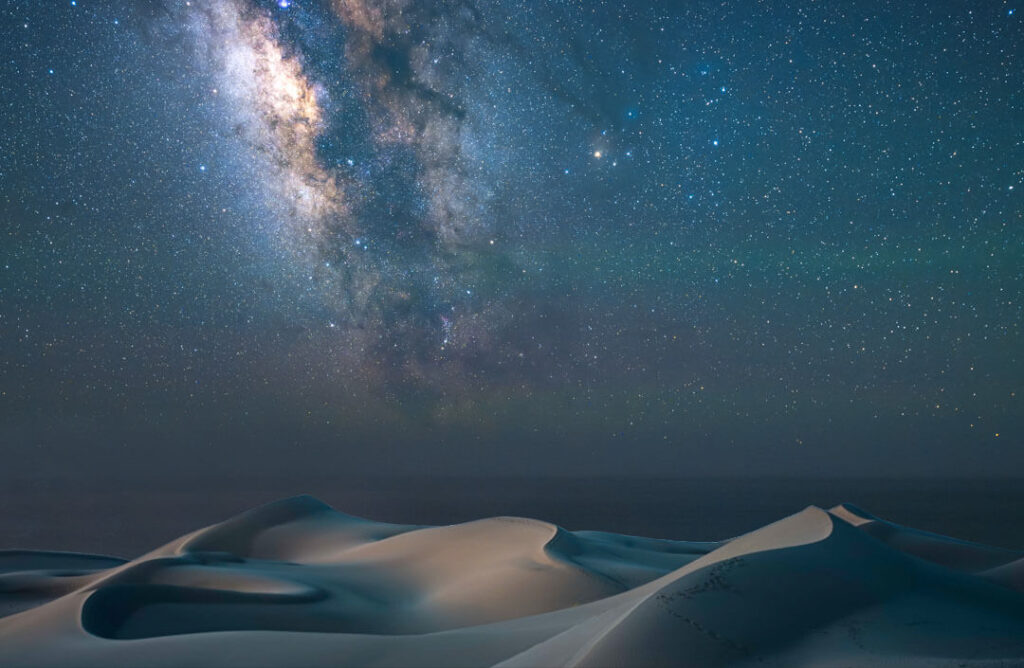
A blue hour blend is a stacked image of a night sky blended with a blue hour photo of the foreground.
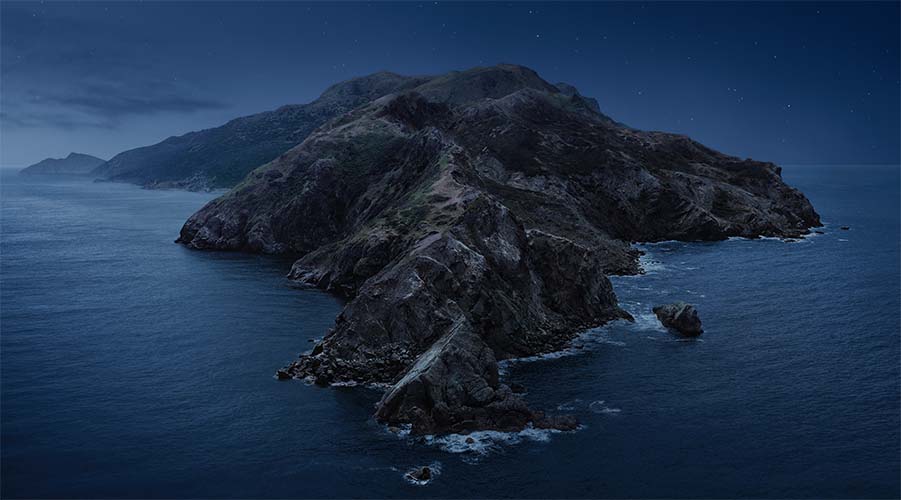
Blue hour blends are how you get pro-level astrophotography images. Have you ever seen the desktop image of Catalina island on a mac?
That’s an example of a blended image. These images are heavily stacked and processed at different times of the night to blend the blue hour right before nightfall with the later hours of the night when the stars appear.
How to do blue hour blends?
1. Scout a location
Finding a location earlier in the day will make the process at night easier and less stressful.
2. Find your blue hour composition
Setting up your composition during blue hour will give you much more light than when it’s dark and difficult to see.
3. Focus stack from foreground to background
Start at f8-f11and take multiple images from the closest foreground to infinity. Plan on 10-15 images.
4. Capture the background (Milky way, night sky, star trails)
Use the NPF rule from photopills to calculate the correct shutter to avoid star trailing. Use a larger aperture f2.8 or larger. Take 7-10 images to stack in post for less noise.
5. Blend the blue hour foreground with background in post
Use starry landscape stacker or Equestrian to stack your images and blend them together in photoshop.
At this point you should have 2 separate images. One image of a blue hour foreground, and one image of the night sky.
Next take the two images and blend them together in photoshop.
When is blue hour?
Blue hour begins after sunset and ends after astronomical twilight or when there is no visible sunlight in the night sky.
Why shoot at blue hour?
Shooting at blue hour helps you get better color in the final image, increases foreground details, and decreases noise. It also gives you more visible light to be able to compose your shot.
What is the best time to shoot the stars at blue hour?
Shooting at blue hour really depends on what you want to capture. Do you want to capture more color in the sky at the beginning of blue hour, or do you want to wait until astronomical twilight to focus your attention on the milky way?
If you’re not sure the best time to capture blue hour, try experimenting by capturing a photo at the beginning and end of blue hour.
The challenge of Blue hour
It can be difficult to find the right composition right around blue hour and more challenging to wait for the milky way to rise for the perfect shot. If you miss blue hour, don’t worry. You can still get clean images with a little focus stacking.
You can even skip focus stacking and blue hour all together and still capture beautiful images of the night sky.
Here are the pros and cons of doing astrophotography at blue hour.
Shooting at blue hour Pros and Cons
While there are many benefits to shooting blended images at blue hour, it can be time consuming and some criticize these types of images.
Some argue that stacking and blending images is not photography in its purest form.
While I agree, I also think that all images are manipulated to some degree.
We rely on the camera manufacturers to interpret colors we see in our images, and we correct for them in software like Lightroom or photoshop.
Some day we may have cameras that will be good enough to blend blue hour photos. Until that day, I say do your best work and take the best image you can.
Pros
- Less Noise
- More detail
- More colors
- Less shadows
- More light to compose an image
Cons
- Time consuming
- More work
- Some criticize blended images
Conclusion
Shooting astrophotography at blue hour is the best way to get the cleanest and most detail out of your astrophotography images.
Blending these images in combination with focusing stacking the foreground and background is what makes these images stand out.
All edited astrophotography images are color corrected based on interpretation and creativity. Shooting at blue hour is just one other way to add our interpretation on how we see the night sky.
I hope you enjoyed this article. To learn about the best lens I used for star tracking click here.